Monday, 23 May 2016

Playroom Makeover with PillowFort

Emily Henderson Target Pillowfort Playroom Makeover Canopy

As you know I've done a lot of baby rooms (I have two myself, after all), but playrooms are even more fun to do for pretty obvious reasons. I used Target's new, very wonderful and affordable kids decor line, PillowFort, to furnish and accessorize almost the whole space – so it's a look you can absolutely get if you are into it. The collection is so good you guys, full of easy to mix simple pieces of furniture and a lot of really playful accessories – pillows the shape of ice cream cones, for instance.


The “client” this time was the family of Green Wedding Shoes. Jen and Jayson who have a 3 year old, Sienna, and just gave birth to another daughter, Dakota. Congratulations, Jen. Welcome to the 2-kid club. It's not exactly like the clubs I used to try to sneak into when I was 18, but it's definitely full of excitement and way more A-list.


If you are into the whole design process, seeing the full room, and watching a 3 year old style with me, here you go:


When we first met the room, it looked like this:


Pillowfort Playroom Target Before 2

Clearly they had just moved in, and were in dire need of everything. But the bones were good, and the space was pretty simple.


playroom-before

They mostly had left over furniture and random little pieces.


playroom-before-2

The style of the house is contemporary with a lot of industrial vibes, like rustic beams and black railings. This playroom is a transition room – it's a loft at the top of the stairs which leads into both kids bedrooms. Our goal, stylistically, was to make the room feel seamless in the home and yet obviously really girly and playful. And functionally it needed storage, a sitting area for reading/cuddling, and a craft/activity table.


We pulled together a preliminary moodboard to help guide the direction.


Pillowfort Playroom Moodboard Pink Mint Green Kids

More would be added and things would shift, but this was our jumping off point.


With out any further ado, the playroom of my dreams:


Emily Henderson Target Pillowfort Playroom Makeover 02

So much to chat about. Everything you see in there is from the PillowFort collection, except the wallpaper and the custom daybed (come back tomorrow for full post about that). Like I said, the collection is really good. They nailed the colors (with lots of options) and they designed it so that kids would love it, sure, but that we as parents would want to be around it. Who doesn't want an excuse to own a pillow shaped like a panda head for instance? No one. There is so much more than we could even use in this room, so go check out the full collection before you tackle your kids room (there are even beds and dressers).


Let's talk wallpaper. If you are in the market for some playful and fun wallpaper in a quiet/sophisticated tone, look no further. This is charcoal and white so it works with any color palette, and yes, those are tiny houses. It is designed by Sissy and Marley and it comes in a few color-ways, so check their site to see what else they have (we love all of their wallpaper).


We chose this one because the pattern was more of a texture than a big, bold, busy pattern adding to the potential chaos of the room. When choosing wallpaper know that the smaller the pattern, the less busy it is (although ironically  a medium size pattern is WAY more busy than a really large pattern – like Charlie's wallpaper). I actually thought this pattern would be bigger than it turned out to be, but I love the scale of it. It's soft and just adds so much texture without nutty-ness.


The Pillow Fort canopy really was the inspiration for the daybed (we are doing a whole post on the custom daybed tomorrow so please come back for full how/why/how much info). Back to the canopy. Have you ever personally met a person who doesn't want to lounge under a canopy? They are a universal hit. It's such a fun, cute place for anybody to read, especially a 3 year old girl named Sienna.


Emily Henderson Target Pillowfort Playroom Bench Makeover 01

We curated the pillows so that there were enough that were square, rectangular, and sculptural. I love that I just wrote that we “curated sculptural pillows” for a playroom. To be fair that panda head and “Hooray!” are indeed pillows, and pretty great. All of the pillows had our light, fun, bright color palette with enough negative space pillows mixed in so it didn't feel really heavy.


Emily Henderson Target Pillowfort Playroom Makeover 07

We added the sconce to give them some light over there for reading, without needing any side tables. Remember for kids rooms, the less furniture the better, as they need more room for playing, resting, fort making, etc. This plug-in sconce is perfect (and it comes in white as well).


My “pillow deciding” pose is really one of my best.


Emily Henderson Target Pillowfort Playroom Makeover 03

Bean Bags. Let's talk about those for a while. In our next house every room possible will have some form of bean bag. These two are extremely comfortable – for kids or grownups. They are low and slouchy, but oh so comfortable, and they love you back. They don't need those pillows, but those two are a couple of my favorites, so we styled with them to show them off.


Those wall bookshelves are a great invention if you need access to some books but don't have room for a piece of furniture. Also if you want to know my favorite book to read to Charlie for the last 2 months I think it would be Dragons Love Tacos (well, that and Frog On A Log).


Emily Henderson Target Pillowfort Playroom Makeover Book Pockets

The beanbags, shelves, and rug come in a few different colors. We have that rug in our family room right now as Elliot's playmat because it's so soft and we all love it. It stays put and is easy for her large noggin to land on. I started noticing that Target is making their rugs with built-in rug pads on the bottom, so they stick and stay on the ground. Genius. Some day, for my 50th birthday I'm going to announce to the world that I will never, ever, ever deal with a rug pad again. Have you ever put a rug under your bed and then realized that it needed a rug pad? That'll ruin your Sunday, I promise.


Lets take a look at the new activity table area:


Emily Henderson Target Pillowfort Playroom Makeover 05

I love those play tables and chairs, and even tried them in my house but Charlie is still a bit little for them (Sienna is 3 and she's barely tall enough). They don't need pillows, but certainly look cute with them. Those chairs also come in pink, black, and white. They are designed to be really stable and not slip (see those little rubber bits on the bottom?). I had no idea how important it is to have kids furniture be really stable, but it turns out that kids sure aren't.


Emily Henderson Target Pillowfort Playroom Makeover 04

A playroom isn't complete without a fort or some sort of teepee. Enter this adorable guy:


Emily Henderson Target Pillowfort Playroom Makeover 10

We layered it full of pillows and hung some string lights (maybe just do this for your, say, photo shoots as they are outdoor glass bulbs…not exactly my most kid friendly move). I love that fun pattern on it – which helped bring in more black/white to that part of the room.


Emily Henderson Target Pillowfort Playroom Makeover 12

When stringing those lights make sure to sit in the most flattering (yet uncomfortable) position with a pleasant look on your face. Also thanks, Danielle, for making that hair look so pretty.


I don't have a clean shot of the shelving, but we gave them two matching shelves and decked them out with bins for storage. The shelves are really simple, clean, and can work in most homes/styled.


Emily Henderson Target Pillowfort Playroom Makeover Kids Tent

If you are in the market for a teepee know that it takes up a lot of real estate  – when fully open they are HUGE. Obviously you wouldn't STUFF it with pillows as we did – but I wanted to show off more product and style it up for the shoot. Just throw in a couple larger floor pillows and that pineapple pillow, obviously, and call it a day.


Emily Henderson Target Pillowfort Playroom Makeover 11

Lastly we created a little dress-up area with her tuu-tuu collection and wings/tiaras with some simple hooks and that adorable “Girls Rule” sign. I can't wait 'til Elliot gets a tiny bit older and wants to play dress up (if she is into that) because this mama will curate the most amazing vintage girls (and adult) dressup trunk EVER. I can finally look like the crazy bag-lady that rules my insides, all in the name of playing with my daughter.


Emily Henderson Target Pillowfort Playroom Makeover Dress up Corner

We pulled off this makeover in 2 days – with a few weeks of planning, obviously.


Target Pillowfort Playroom Makeover Kids Childrens Mint Green and Pink Activity Room Emily Henderson Before and After 2
Target Pillowfort Playroom Makeover Kids Childrens Mint Green and Pink Activity Room Emily Henderson Before and After 1

There we have it – a fun, poppy, adorable, whimsical playroom for this lovely family of (now) four. In our next house I would feel pretty lucky to have a huge playroom for the kids like this to really go nuts in, and not have to worry about how much their mess clutters up our area. But, if you don't, like us, this collection is cute enough for the whole family.


Emily Henderson Target Pillowfort Playroom Makeover Green Wedding Shoes

Feel free to copy it and get that look. And DON'T forget to watch the video and check out Jen's perspective over on Green Wedding Shoes. 
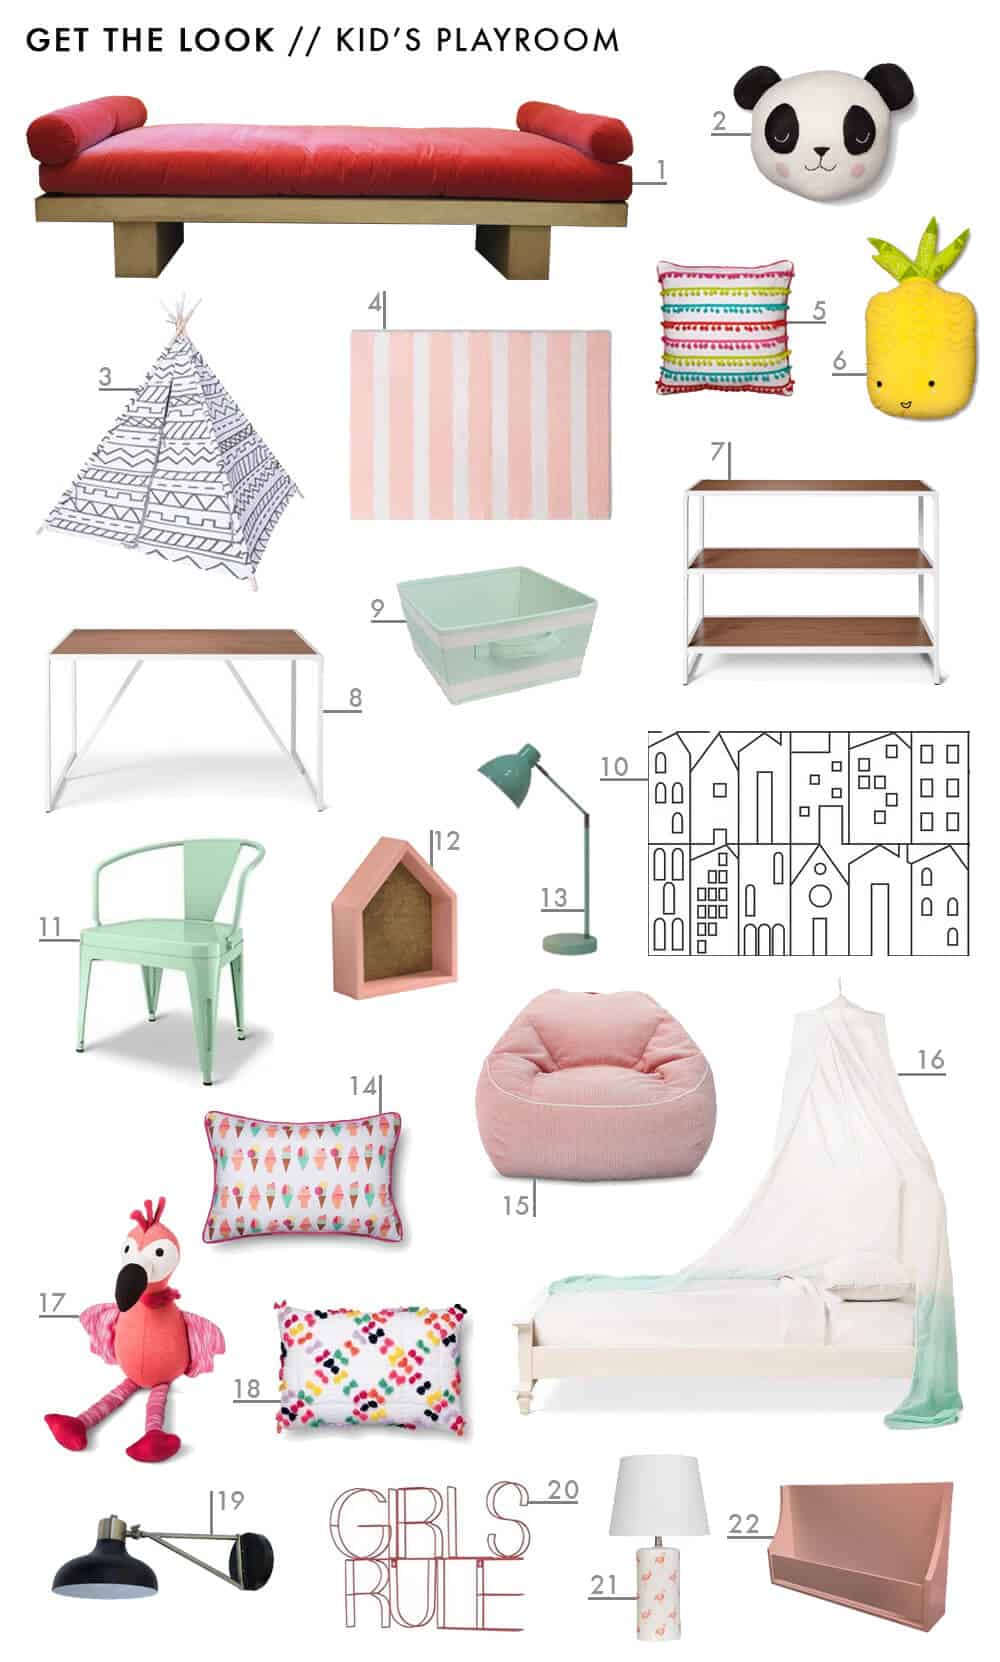

Target Pillowfort Get The Look Kid Childs Playroom Colorful Pink Emily Henderson

Sources:


1. Wooden Day Bed (Custom, but similar) | 2. Panda Head Wall Decor | 3. White & Grey Teepee | 4. Pink Stripe Area Rug | 5. Pom Pom Pillow | 6. Pineapple Throw Pillow | 7. Boone 3-Shelf Kids Console Bookcase | 8. Boone Activity Table | 9. Mint & White Striped Fabric Bin | 10. My House Charcoal Wallpaper | 11. Industrial Kids Activity Chair in Aquamint | 12. House Shelves With Pinboard | 13. Mint Desk Lamp | 14. Ice Cream Patterned Throw Pillow | 15. Corduroy Bean Bag Chair | 16. Dip Dye Bed Canopy | 17. Flamingo Throw Pillow | 18. Oh Joy Tassel Pillow | 19. Crosby Swing Arm Sconce | 20. Girls Rule Wire Wall Decor | 21. Flamingo Table Lamp | 22. Pink Book Shelf


Also available: Yellow Polka Dot Pillow | White Giraffe Bookend | Knit Doll | Gold Modern Hook | Girls Tutu Skirt | Embroidered Striped Pillow | Diamond Square Pillow | Red & Mint Patterned Pillow | Small Wooden Planter | Wooden Architectural Blocks | Oh The Places You'll Go Book | Metal Lantern | Globe String Lights | Orange Jersey Diamond Lumbar Pillow | White Flower Applique Flower Pillow | Yarn Dyed Geo Pillow |  Panda Head Throw Pillow | Multicolored Tassel Throw Pillow | Flower Bear Throw Pillow | Ice Cream Cone Throw Pillow |  Hooray Throw Pillow | Party Hedgehog Figurine


Into kids design? Here you go: Elliot's nursery, Charlie's nursery, The Shelter Nursery, A floral/glam nursery, A playroom refresh,  Neutral (Well, Mostly) California Nursery, Moonrise Kingdom Boy's Bedroom, A Rustic Mid-Century Family Room. Kids Room's roundups


*Photos by Tessa Neustadt, Video by Scrunch Media, Hair and Makeup by Danielle Walch. This post is part of a larger collaboration with America's (and my) favorite major retailer, Target. 


The post Playroom Makeover with PillowFort appeared first on Emily Henderson.

Saturday, 21 May 2016

MY CRAFT CHANNEL: DECORATING WITH SIGNS

Signs are all the rage is decorating these days. And we are absolutely in love with our new plank signs. Watch our My Craft Channel episode for inspiration on using signs in your home decor.


Take 25% off Plank Signs when you shop online at thewoodconnection.com and use code “signdecor” or in stores and mention My Craft Channel. Valid through June 3, 2016


The post MY CRAFT CHANNEL: DECORATING WITH SIGNS appeared first on The Wood Connection Blog.

Friday, 20 May 2016

Notes from the Road (5) - Travels with Ivan

You've met my new Ukrainian friend, Dr. Ivan Sopushynskyy, as we took short trips here in Pennsylvania to a logging site and to a truss and beam operation. But in March and April, we got serious and really hit the road. The next few posts will hit the highlights of our waypoints.

We headed South to Florida and back in March, and to the great lakes in April. I discovered that as interesting as our Pennsylvania timber industries and forests are, they are in many ways similar to those of western Ukraine where Ivan is from. So, in order to help him get a fuller experience of the diversity of the American forest industries, I knew we had to hit the road. And hit it, we did.

Unfortunately, I can't share my excellent documentary photography and videography from the southern leg with you. Through some type of technical glitch I still don't understand, I somehow lost all my photos and video in the process of transferring them to my laptop computer on the last day of the trip...and didn't realize it until a few days later, when I couldn't find them. Luckily, Ivan took some good stuff at a few key points on the trip, so I'll use his for the southern swing.

We stopped first at our state capitol in Harrisburg, where one can view a level of architecture and building magnificence that will probably never again be equalled. When you take the full tour, you're simply blown away by the level of thought that went into every chamber of the building.

The Chamber of the Pennsylvania House of Representatives. The painting is Apotheosis of Pennsylvania, Photo by Ruhrfisch - https://commons.wikimedia.org/w/index.php?curid=9661672

From Harrisburg we continued south a few miles to the Gettysburg battlefield. I've had the opportunity to tour the site many times, and it gets better every time. Showing the battlefield to Ivan, I realized that as fascinating as our Civil War seems to us, it is only a vague concept in ancient history to non-Americans. And as such, I found it difficult to explain exactly why the war happened in the first place. I'll say this - I saw the battlefield in a very different light this time, as I struggled to explain not "what" happened, but why it happened at all.

Ahhh, the brave Texans of General Hood's Division. Most of them never came back from the Wheatfield or the Devil's Den at the foot of Little Round Top.

For you Texans out there.

As much difficulty as Ivan had grasping our American Civil War, he warmed up considerably to our history at our next stop - Monticello, the home of President Thomas Jefferson. I've shared a tour of this great place before on Go Wood, so I can't add much to that prior account...except to say, that our conversation turned to the real meaning of liberty, and a country's right to exist, with an earnest intensity as Ivan digested the spirit of the great man in light of Ukraine's current struggle to establish it's own place in the world.

We continued to head south through the Virginia mountains, and spent the night in Galax, Viriginia, home to the headquarters and operations of Vaughn-Bassett furniture company. Bright and early the next morning, we met Jim Stout, the director of manufacturing technology for the company, and he led us through the vast maze of the the largest bedroom furniture plant still operating in the United States. There's a great story behind the company, and its persistent struggle to survive, thrive, and provide jobs to the folks of southwestern Virginia (which you can read about in a book detailing that story, Factory Man by Beth Macy.)

From Galax, we headed into the Deep South. Ride on with us in the next post.


Brady Gives a Refresh to His Vintage Bathroom

Apartment Rental Bathroom Makeover Takeover Redesign Brady Tolbert White and Turquoise_002

Hey Folks, Brady here, and today on the blog Emily has given me full liberty to talk about a very important issue, her morning routine. I kid, but everyone has one: Kesha “brushes her teeth with a bottle of Jack,” Gweneth probably steams her _______ (you know what) before applying edible face cream which saves the environment and baby pandas, and well… then there is mine. It used to be pretty dismal until just a few weeks ago when my rather drab rental bathroom got a major facelift.


Brady's Bathroom Makeover Takeover White Turquiose Gold Tile Before and After 1

As you can see on the left in the before pic, it wasn't great, but it did have some majorly great aspects that I loved and allowed me to look past the disgustingly dirty floors, the unusually low sink, and the small size of the room. The vintage basketweave tile, the cast iron tub, and the tall ceilings all meant it had major potential to go from 2012 Kylie Jenner to 2016 Kylie Jenner, for those of you that might not fully get that reference call me as we have a lot to catch up on.


Let's start with the major fixes. The toilet and sink. These may seem like HUGE projects but are relatively easy and can make a big difference in your space. 5 years ago if you wanted an affordable toilet or sink, you had very few options and got the look of a budget toilet or sink. But, nowadays there are some very good looking toilets and sinks that are definitely rental and pocket-book friendly (and don't worry we have a huge roundup of those coming very soon).


For those of you that are renters, I would definitely check with your landlord before you go in and start ripping things apart and replacing hard finishes in your place. But if they are open to it and it is something that you want to do then I would definitely recommend swapping them out. There are just some things that 20 thorough cleanings of clorox can't wash away on a 15-year-old toilet and sink. Needless to say, my new toilet, new sink, and faucet make me so much happier than those sad dated ones that lived in there previously.


Brady's Bathroom Makeover Takeover White Turquiose Gold Tile Before and After 2

As the apartment is vintage, I wanted to find something that would echo the charm and character of the place so I ended up going with this toilet, this sink, and this faucet which I could not be more happy with. They both work so well together and, even just having those three new pieces in the space, made a world of difference.


Apartment Rental Bathroom Makeover Takeover Redesign Brady Tolbert White and Turquoise_1_002
Brady's Bathroom Makeover Takeover White Turquiose Gold Tile Before and After 3

I also added a new brass shelf above the toilet to fill that huge empty space, as well as a new towel ring because well…. the one on the left just wasn't working for me and all of those pretty new pieces that were going to live next to it.


Apartment Rental Bathroom Makeover Takeover Redesign Brady Tolbert White and Turquoise_007

We all know that good light is important in a bathroom, and as I only have one small window and previously a one-light-flush-mount, it was time to upgrade to something more useful and more pleasant to look at. I went with this chandelier which I love. I had it made to come down 28″ inches from the ceiling, which you would think would make the space feel smaller but in fact having that depth to the light extends your eye line up to the tall ceilings. It also hides your wrinkles, diminishes hair loss, and makes your muscles look bigger. (I swear).


Now that we have talked about what I did to some of the hard surfaces in the space (light, sink, faucet, toilet, shelf), let's talk about how you can bring some life into a rather bland bathroom with some very quick and easy fixes. I am no professional stylist, nor will I claim to be, but there are a few things to help your space feel more lived in, more you, and more comfortable.


Apartment Rental Bathroom Makeover Takeover Redesign Brady Tolbert White and Turquoise _3_012

Scent: This one is big in a bathroom (DUH… cue potty humor jokes). This candle has been my go-to for a long time both in and out of the bathroom. The scent is amazing (Gramercy Park Hotel actually uses it for all their products and burns it in all public spaces) and it doesn't burn too fast like other candles. Basically, if you have a clean surface to create an area for a candle and a few matches, then you should do it. You and your guests will appreciate it.


Apartment Rental Bathroom Makeover Takeover Redesign Brady Tolbert White and Turquoise_010

Mirror: Depending on your bathroom this is one of the easiest and most impactful fixes. My bathroom previously had a built in medicine cabinet with layers and layers of paint on it. I knew that I couldn't rip out the medicine cabinet so instead I just popped the mirrored door off by the hinges which left me with a flat surface which allowed me to mount this brass beauty from Restoration Hardware on top of the old medicine cabinet recess.


Apartment Rental Bathroom Makeover Takeover Redesign Brady Tolbert White and Turquoise_4_016

Be Your Own Guest: Trust me when I say I don't live a life of luxurious bubble baths and champagne toasts everyday. But that doesn't mean you can't fantasize about it and create your own little bathroom oasis. My bathroom is SMALL and when I say small, I really do mean small. It is about 5'x5′, so I didn't have room for a cute curio cabinet with bath salts and all my “lotions and potions”, as my dad likes to call them. But I was able to add a little side table stump, a small bud vase, and a sponge and face cloth (for all those days that I use a face cloth and sponge)… who am I kidding, throw that shit off of there and bring in a bottle of wine, while you have the Kardashians on your laptop which is cantilevered on your toilet. Isn't that what all good side tables and toilets are for?


Brady's Bathroom Makeover Takeover White Turquiose Gold Tile Apartment Rental Redesign Side by side

Make it Personal: No matter where the space may be in your house/apartment, if you just fill it with pretty things, it will just be a room filled with pretty things. Always bring in something to really make it your own. Mine happen to be a few polaroids of some of my best friends and family I have tucked into the edges of my mirror – and they're doing a damn good job of getting my butt to the gym every morning. Just a bunch of skinny minis and my little sister, sporting a full six-pack only a few months after popping a baby out. If that isn't motivation to do some planks every day I don't know what is.


Apartment Rental Bathroom Makeover Takeover Redesign Brady Tolbert White and Turquoise_009

All in all, I could not be more happy with my little bathroom oasis, what do you think? If you are ready to create the look yourself, head on down below where I have pulled together a get the look with everything I used.


Apartment Rental Bathroom Makeover Takeover Redesign Brady Tolbert White and Turquoise _001
Apartment Rental Bathroom Makeover Takeover Redesign Brady Tolbert White and Turquoise_Roundup

1.Magical Thinking Pompom Shower Curtain | 2. Le Labo Santal 26 Candle | 3. Jacquard Bath Towel | 4. Newport Brass Bathroom Faucet | 5. Kohler Pedestal Sink | 6. Satellite 6 Chandelier in Natural Brass | 7. Brake Angle Brass Shelf | 8. Astoria Pivot Mirror in Antique Brass | 9. Kohler Two Piece Toilet | 10.Coyuchi Mediterranean Towel | 11.Two Men Collage by Scott Bergey | 12. Irvine Modern White Frame | 13. West Emory Ring Holder | 14. Diamond Dot Ceramic Bath Tray | 15. Warm Metal Waste Basket (similar) | 16. Morgan's Toothpaste | 17. Morgan's Wood Toothbrush | 18. Courtesi Wood End Table


Enjoyed this makeover post? Check out these: A DIY Kitchen Redo Under $400, Scott's Bedroom Makeover With Leesa, A Rustic Mid-Century Family Room, Sara Updates Her Childhood Bedroom – The Reveal, The Easiest Guest Room Makeover Ever, Brady's DIY Peel and Stick Kitchen Flooring (For Under $50), How To Layout A Narrow Living Room, New Kitchen Project and Design Plan.


***After photos by always lovely and handsome, Zeke Ruelas


The post Brady Gives a Refresh to His Vintage Bathroom appeared first on Emily Henderson.

Thursday, 19 May 2016

A Sophisticated Playroom

Suzanne's Sophisticated Childrens Playroom Makeover Neutral Kids Blue Grey Emily Henderson-035

A month ago I was at my friend Suzanne's, planning her bedroom makeover when I realized that her playroom was almost blog worthy. So I said, “Hey can I style your playroom and shoot it for the blog and take credit for all the cute things you've done?” She obliged, knowing she would get free styling and some new stuff. The space was great, it just needed some extra help. I'm a good helper.


Here it was before:


Suzannes Child Playroom Makeover Before Photo 1

That is a very unfair “before” shot as that was after Charlie and Townes had played/fought for a 1/2 hour. Just when you think you have the sweetest toddler on the planet, he proves to you that he is really just a sociopath. It takes them 3 hours of fighting to start having fun and sharing toys. Meanwhile someone's home always gets destroyed. This time it was hers. But you get the gist – it was this pretty neutral, rustic, and warm space that could use like 15% styling help. It was open to the living room and dining room so this wasn't the time to paste that tella tubby mural on the walls.


Suzannes Child Playroom Makeover Before Photo 2

This area, towards the dining room, in particular needed more help. She installed those shelves (that she stained herself) and they weren't styled yet and felt empty. In addition she needed more storage, a larger rug, and the sofa needed some softening.


So we took two trips to Target and grabbed a couple plants and quickly fixed all those problems. Here you go:


Suzanne's Sophisticated Childrens Playroom Makeover Neutral Kids Blue Grey Emily Henderson-067

This side of the room changed very little and, like I said, it looks like I styled it when she did the bulk of the work. Sure, we added a plant, styled the books, and rearranged the table to face camera better (which was a cheat as we shot it the other way in the other position). Everything she had done made the room feel as big as possible and reduced the clutter (when there weren't two toddlers destroying things).


Suzanne's Sophisticated Childrens Playroom Makeover Neutral Kids Blue Grey Emily Henderson-024

There are a few things here you should know: 1. She painted the bottom of the Thomas The Train table – a table that Brian and I have debated buying for months based on her recommendation, but we have NO space to put it so we are holding out. I guess typically the base of it is super colorful in a bad way, so she painted it that pretty pale gray and it looks so cute.


The second thing you should know is that she renovated that play kitchen. Like a whole kitchen overhaul on a miniature scale. Apparently this isn't unheard of – check out this post for 10 other ideas for a play kitchen remodel. I was still extremely impressed.


When she bought it, it looked like this:


Duktig Ikea Kids Play Kitchen

But she wanted it to look like this, without that price tag.  So she painted it, put in a backsplash (subway tile contact paper), installed new countertops (marble contact paper) and reinstalled 'copper' hardware and faucet (spray paint).


Suzannes Child Playroom Makeover Emily Henderson Styling Kids Play Kitchen After 1

I feel like I do a lot in our home and that I'm useful and full of good ideas, but there is no way I would have thought to do this. Ever. She is a very good woman.


Suzanne's Sophisticated Childrens Playroom Makeover Neutral Kids Blue Grey Emily Henderson-095

Now the other side of the room looks pulled together. The bookcase looks like a combination of playroom and grownup family room.


Suzanne's Sophisticated Childrens Playroom Makeover Neutral Kids Blue Grey Emily Henderson-087

Here's what we did:


1. Added closed storage for the unsightly toys (the pretty linen storage bins).


2. Displayed the cute toys like the trucks out as “objects” on the shelf.


Suzanne's Sophisticated Childrens Playroom Makeover Neutral Kids Blue Grey Emily Henderson-120

3. Added some art to help take up some real estate (so it didn't look so bare), and art in the back of the shelf always adds depth.


4. Threw in some lamps to bring light over in that area during evening play hours (and strung the cord behind the vertical shelving pieces).


5. Displayed books with cute bookends or horizontally.


Suzanne's Sophisticated Childrens Playroom Makeover Neutral Kids Blue Grey Emily Henderson-108
Suzannes Child Playroom Makeover Emily Henderson Styling Kids Shelf Organization After 2

The sofa was perfectly simple and functional but felt sad, so we added that pretty throw and some pillows.


Suzanne's Sophisticated Childrens Playroom Makeover Neutral Kids Blue Grey Emily Henderson-098

As any mom of toddlers know, you want as few pieces of furniture possible in a playroom because those kids need space. No coffee table or unnecessary side tables were added – just a cute pouf (kids love to play on or around poufs) and textiles.


The rug worked well with the other rug and was a much better scale in the room (5×7). It is low pile enough so that cars can get rolled over, but still cozy for floor time playing.


Suzanne's Sophisticated Childrens Playroom Makeover Neutral Kids Blue Grey Emily Henderson-109

I love those animal pillows. Ridiculous.


There you have it – a quick playroom refresh before and after.


Suzannes Child Playroom Makeover Emily Henderson Styling Before and After 1

I think that what Suzanne did so well was keep the color palette really simple, neutral, and pretty. The blues, greys, and whites all work with the whole house (which is fairly open) and keep it feeling quiet in what is surely the most chaotic room. I think that if your playroom is separate from your living space, then go for nutty colors for sure; but if it's open like this one, then be inspired by the simplicity here and keep it tonal. The toys and books will add those pops that make it feel playful.


Overall the transformation took a day and while we didn't do anything major, it really is a more pulled together, adult friendly and still a pretty happy place for toddlers to totally destroy.


Get The Look Kids Neutral Playroom

1. Gray Convertible Futon | 2. Stag Head Decor | 3. Brass and Marble Square Accent Lamp | 4. Everything but the Dalmatian Fire Engine | 5. Ahoy Matey Framed Map | 6. Dinosaur Framed String Art | 7. Octopus Throw Pillow | 8. Safavieh Weston Natural Fiber Rug | 9.Zig Zag Embroidered Pillow | 10. Whale Throw Pillow | 11. Embossed Ceramic Table Lamp | 12. Ceramic Elephant | 13. Black & White Striped Vase | 14. Lidded Canvas Milk Crate Box | 15. Striped Cotton Blanket | 16. Wood Rhino Figurine | 17. Duktig Play Kitchen | 18. Ivar Pine Cabinet | 19. Black & White Pot | 20. Wheely Lady Bug Ride On | 21. Black & White Patterned Pouf | 22. Rhino Wood Bookends | 23. Greenich Gray & White Polka Dot Rug


Enjoyed this makeover post? Check out these: A DIY Kitchen Redo Under $400, Neutral (Well, Mostly) California Nursery, Scott's Bedroom Makeover With Leesa, Moonrise Kingdom Boy's Bedroom, A Rustic Mid-Century Family Room, Sara Updates Her Childhood Bedroom – The Reveal, The Easiest Guest Room Makeover Ever, Brady's DIY Peel and Stick Kitchen Flooring (For Under $50).


The post A Sophisticated Playroom appeared first on Emily Henderson.